Taking a screenshot is a great way to capture what’s on your screen, save it for later use or share it with others. While each operating system has unique methods for capturing a screenshot, this is a simple process that can be done with just a few keystrokes or clicks – but only if you know how. And we will show you exactly how to do it, whether you have a Windows laptop, MacBook, or Chromebook.
 How to take a screenshot on a Windows Laptop
Windows laptops come in many different models and brands, but the basic principles of taking a screenshot on any of these devices are practically the same. Here are several ways you can screenshot on a Windows laptop:
Using the Print Screen key
Pressing the Print Screen key is the easiest way to capture a screenshot of your entire screen, including the taskbar and all open windows. Just follow these simple steps:
- Press the Print Screen key (PrtScn, PrtScr, PrtSc) on your keyboard, usually located in the top right corner, next to the F12 key. The screenshot will be copied to your clipboard.
- Open an image editing software, such as Microsoft Paint or Adobe Photoshop, or any program where you can insert images, such as Microsoft Word.
- Paste the screenshot into the chosen program.
- Save the screenshot as an image file, such as a JPEG or PNG. (if using image editing software)

Using keyboard shortcuts
You can also take a screenshot using keyboard shortcuts on your Windows laptop:
Windows + Print Screen
- To take a screenshot of your entire screen and automatically save it to your laptop, press the Windows + Print Screen keys.
- Your screen will dim briefly to indicate that the screenshot has been taken.
- Open the Pictures folder on your laptop. You should see a new folder called Screenshots, where you can find your screenshot.
Alt + Print Screen
- To take a screenshot of only the active window instead of the entire screen, press the Alt + Print Screen keys. The screenshot will be copied to your clipboard.
- To edit or save your screenshot, open an image editing software, and paste the screenshot.
Using the Snip & Sketch tool (Windows 10)
The Snip & Sketch tool is a newer, more advanced screenshot tool built into Windows 10. It replaces the Snipping Tool and provides more features, including the ability to crop, resize, and annotate screenshots. Here’s how to use it:
- Open the Snip & Sketch tool by typing "Snip & Sketch" in the search bar in the bottom left corner of your screen or by pressing the Windows key + Shift + S.
- Click “New” to start a new snip.
- A small menu will appear at the top of your screen with options to capture a rectangular, freeform, window, or full-screen snip. Select the type of snip you want to take.
- Use your mouse or finger (if you have a touchscreen) to select the area of the screen you want to capture.
- After capturing the screenshot, you can use the built-in editing tools to edit your screenshot.
- Save the screenshot as an image file or share it by clicking on the share icon in the top-right corner of the window.
 Using the Snipping Tool (Windows 11)
- Use the search located in your Windows Start Menu and Type in "Snipping Tool".
- Open the Snipping Tool.
- Make sure the Photo Camera Icon is selected.
- Press Windows Logo Key + Shift + S to start a capture or Click "+ New".
- Choose your selection type you would like to use. Rectangular, Region, Window, or Full Screen should be available.
- Click and drag or click the area you'd like to capture.
- After capturing the screenshot, a notification should show with a preview image.
- Images are saved in your Pictures > Screenshots folder.
Using third-party screenshot tools for Windows
While the built-in screenshot tools on Windows are sufficient for most users, you can install free or paid third-party screenshot apps if you want more advanced features. Some of the best options include Lightshot, SnagIt, ShareX, PicPick, and Greenshot.
 How to Take a Screenshot on a MacBook
You can easily take screenshots on your MacBook using keyboard shortcuts, built-in software, or third-party apps.
Using keyboard shortcuts
- To screenshot the entire screen, press Shift + Command + 3.
- To take a screenshot of a portion of your screen, press Shift + Command + 4. Your cursor will turn into a crosshair. Click and drag the crosshair to select the area of the screen you want to capture.
- To take a screenshot of a single window or the menu bar, first press Shift + Command + 4, then press the Space bar. Your cursor will turn into a camera icon. Move the camera icon to highlight the window or the menu bar.
- To take a screenshot of the Touch Bar, provided that your Mac has one, press Shift + Command + 6.
- The screenshot will be saved on your desktop as a PNG file with a filename that includes the date and time.
Using the Screenshot app
You can also take screenshots on your MacBook using the built-in Screenshot app, as long as you have macOS Mojave or later. This app also provides additional options, such as setting a timer or choosing where to save the screenshot. Here’s how to use it:
- Press Command + Shift + 5 to open the Screenshot app.
- A menu bar will appear at the bottom of your screen with three screenshot options on the left – for capturing the entire screen, a specific window, or a portion of the screen.
- Click on the option you want to use.
- Click the Capture button in the menu bar to take the screenshot.
- The screenshot will be saved on your desktop as a PNG file.
Using third-party screenshot tools for Macbooks
Although the built-in Screenshot app on a MacBook is a powerful screenshot tool, you can always opt for third-party apps that offer extra features. Skitch, Snagit, Monosnap, and Lightshot are some of the best apps for taking screenshots on a MacBook.
 How to take a screenshot on a Chromebook
Taking a screenshot on a Chromebook is a little different than on a Windows laptop or MacBook, but it’s still a straightforward process. Here are some ways to screenshot on a Chromebook:
Using the Quick Settings menu
One way to take a screenshot on a Chromebook is to use the Quick Settings menu:
- Open the Quick Settings menu by clicking on the clock in the bottom right corner of your screen.
- Select the Screen Capture tool. It looks like a camera icon.
- A small menu with several options will appear at the bottom of your screen.
- You can choose whether to take a full-screen, partial, or window screenshot.
- You can find your screenshot in your Downloads folder in the Files app.
Using keyboard shortcuts
Another way to take a screenshot on a Chromebook is to use keyboard shortcuts:
- Press Ctrl + Show Windows to take a screenshot of your entire screen. The Show Windows key is located in the top row of your keyboard and looks like a rectangle with two lines on the right-hand side.
- Press Shift + Ctrl + Show Windows to screenshot part of your screen. Your cursor will change to a crosshair. Click and drag the crosshair to select the portion of the screen you want to capture.
- The screenshot will be saved in your Downloads folder in the Files app.
Using third-party screenshot tools for Chromebooks
If you want to enhance your screenshot-taking experience on a Chromebook, you can always try out some extensions available in Google’s Chrome Web Store. Movavi ScreenShot, GoFullPage, Awesome Screenshot and Screen Recorder, Nimbus Screenshot & Screen Video Recorder, and FireShot are options worth checking out. You can also take advantage of these extensions if you’re using a Google Chrome browser on a Windows laptop or a MacBook as an alternative to Safari.
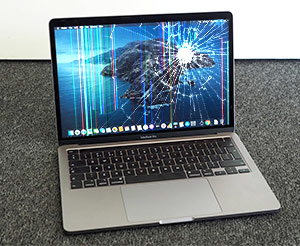 Are you struggling with laptop issues like a cracked screen, charging problems, broken keyboard keys, or liquid damage? Our team of experts is here to help! The Repair Depot has professional technicians that can accurately diagnose and fix any laptop issue you're experiencing, whether you own a Chromebook, MacBook, or Windows laptop. Get a repair quote today, and let us help you get back to school or work with a fully functional laptop!